Google Docs is more than a piece of software. It’s where campaign ideas are shaped, lesson plans come together, interview notes pile up, and client emails get drafted before they hit the inbox. If you mostly open Docs to write and share, there’s a lot more power waiting just beneath the surface. In this guide, you’ll find practical features and workflows that shorten feedback loops, tidy your drafts, and help you collaborate without chaos.
Users can access its simple interface with a Google account and write, save, or share their documents with the world. Packed in a smartphone app and a web version, the tool can be a lifesaver with its synchronization feature, which lets you pull files from the cloud and work from different devices.
From allowing multiple users to work on the same document simultaneously to giving them limited access as viewers, commenters, or editors, the tool has an ever-increasing number of add-ons and options to help you create beautiful documents with less effort.
Let’s give it a big congrats and dedicate this article entirely to this useful writing tool that has saved our careers not only once (at least mine, as a creative, countless times).
Today, we’ll explore seven tips that help you use Google Docs more productively.
Why Google Docs still matters
Docs hits a sweet spot: simple enough for quick notes, strong enough for team workflows. A few common moments where it shines:
- Resumes and cover letters: fast editing, easy sharing for feedback
- Client projects: comments, suggestions, and version tracking in one place
- Meeting notes: structured agendas connected to Calendar invites
- Draft emails: collaborate on wording before sending via Gmail
- Remote collaboration: live edits without file attachments flying around
You get instant autosave, device syncing, and tight integration with the rest of Google Workspace. Even experienced users leave a lot on the table, though. Let’s have a look at the features that can help us achieve greater speed and clarity on a daily basis.
12 hidden Google Docs features you may not know about
1. Use Pageless View for distraction-free writing
Traditional page breaks make sense for print. For digital work, pagination gets in the way. Pageless turns your document into a clean, continuous canvas.
How to turn it on:
File → Page setup → Pageless
Why it helps:
- Distraction-free flow: no page jumps breaking your train of thought
- Flexible width: wide tables, timelines, and screenshots display comfortably
- Brainstorming: long idea dumps and mind-map style notes feel natural
Use cases:
- Long-form articles or research with many subheads
- Creative planning with images, chips, and wide tables
- Product specs or UX copy that won’t be printed
Pro tip: pair Pageless with the Outline panel for quick jumps between sections.
2. Customize dropdown menus for project tracking
Docs can double as a lightweight tracker with Dropdowns. You get colour-coded labels you can tailor to your workflow.
How to add one:
Insert → Dropdown or type @dropdown
Make it yours:
- Rename labels to match your process: “Idea / Draft / Review / Final”
- Pick colours that signal status at a glance
- Duplicate a dropdown across sections for consistent tracking
Where it fits:
- Project pipelines: content status, design stages, QA steps
- To-do lists: priority or owner handoff
- Document workflows: review stages for policy docs, SOPs, or handbooks
Pro tip: place a small dropdown at the top of each section to show status without leaving comments like “is this final?”.
3. Speed up work with email drafts and meeting notes
Docs includes building blocks that blend your writing space with Gmail and Calendar.
Do this:
- Type @email draft to insert a full email block
- Type @meeting notes to pull in a Calendar meeting with attendees and a ready-made note layout
You can collaborate on the email text in Docs, then click the Gmail icon to open a compose window with fields prefilled. Meeting notes link back to the original event, which keeps agendas, notes, and action items together.
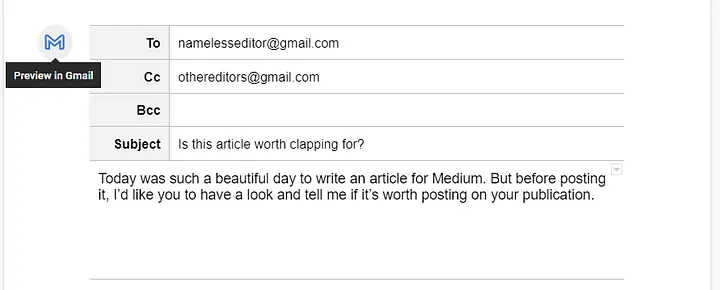
Instead of leaving your document to open a Gmail tab, Google Docs allows you to send emails directly from the document you’re working on.
Press @ and a list of people shows. Select the Email draft option and then search for the name of the person you want to add using @. Google searches through your Contacts and makes suggestions.
Another option for initiating an email from your G Docs file, available for Business, G-Suite Basics, and Google Workspace customers, is through Insert > Building Blocks > Email draft.
After finishing your draft, hit the Gmail icon on the left for a compose window to open. Before sending, you can review the details of the receiver and sender fields, such as To, CC, BBC, the subject line, and the body of the email.
Workflow ideas:
- Marketing teams fine-tune campaign copy in Docs, then send via Gmail
- Account managers prep client updates with @meeting notes and action items
- Teachers share agendas linked to class events, then reuse the template
Working faster with Google Docs productivity tools
4. Dictate your writing with Voice Typing
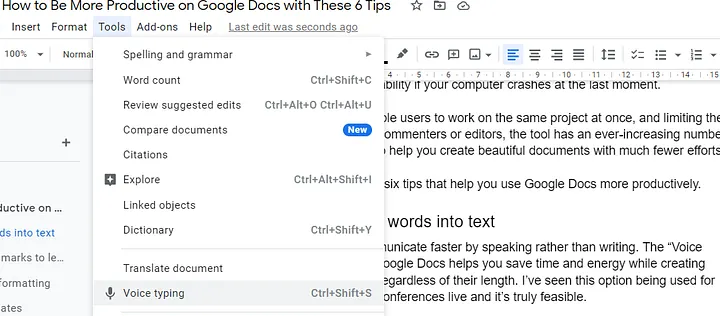
We communicate faster by speaking rather than writing. The “Voice Typing” feature of Google Docs helps you save time and energy while creating written documents, regardless of their length. I’ve seen this option being used for transcribing whole live conferences, and it’s really practical for multitasking.
Activating it is pretty simple. If you’re on Chrome, open a document, select Tools from the toolbar menu, and then Voice Typing. These same steps work for your smartphone. Next, you’re asked for a confirmation to use the device’s microphone or an external mic if available.
Extra tips:
- Speak punctuation for better first drafts: “comma”, “period”, “new line”
- Draft sections by headline: say the header, then the paragraph
- Record interviews, then clean up names and timestamps later
5. Add accent marks for different languages
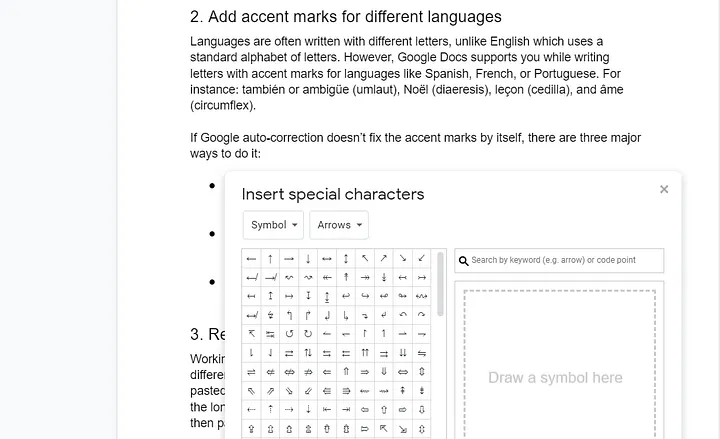
Languages often use different letters, unlike English, which uses a standard alphabet of letters. However, Google Docs supports you while writing letters with accent marks for languages like Spanish, French, or Portuguese. For instance: también or ambigüe, Noël, leçon, and âme.
If you’re curious about what comes after writing with the right characters, check out my guide on how to localize & translate your website in three steps. It walks you through the process of making your content accessible to a truly global audience.
You can use Google Docs to create professional documents in all the possible earthly languages. Sometimes auto-correction is useful, but if it doesn’t fix the accent marks by itself, there are three major ways to do it:
- The first option is to navigate to the space where you want the character entered and choose the Insert > Special Characters and either draw it with your finger, mouse, or touchscreen or select it from the list.
- The second option involves the use of keyboard shortcuts, which are different for both Mac and Windows. For instance, you have to type Option+E (Mac) and Alt+0233 (Windows) to add the letter “é”.
- The last option involves the use of Google’s Input Tools, where you can copy the wanted word or sentence and paste it into your Docs file.
Real-life uses:
- Bilingual teams polishing copy for multilingual campaigns
- Teachers creating accurate examples for language lessons
- Writers keeping names and brands correct across markets
6. Track progress with real-time word count
Word budgets are everywhere: briefs, essays, executive updates. A live counter keeps you honest.
Two quick moves:
- Tools → Word count or shortcut Ctrl+Shift+C
- Tick “Display word count while typing” for a corner overlay
Where it helps:
- Essays and reports with strict ranges
- Client deliverables that must stay tight
- Content drafts with SEO targets
Pro tip: click the overlay to toggle characters and pages when needed.
7. Master keyboard shortcuts and menu hacks
Fewer clicks equals faster writing. A small list that pays off:
- Bold: Ctrl/Cmd + B
- Link: Ctrl/Cmd + K
- Comment: Ctrl/Cmd + Alt + M
- Heading 1/2/3: Ctrl/Cmd + Alt + 1/2/3
- Clear formatting: Ctrl/Cmd + \
- Search shortcuts: Ctrl/Cmd + /
Underused menu gems worth learning:
- Format → Clear formatting: fix wonky paste jobs in one move
- Tools → Explore: search and reference without tab-hopping
- Insert → Building blocks: email drafts, meeting notes, project tables
- View → Show outline: skim big docs and jump by header
Collaborate smarter with Google Docs features
8. Collaborate with comments and emoji reactions
You don’t always need a paragraph of feedback. Quick reactions keep threads tidy.
- Highlight text → choose Add comment or the emoji icon
- Use 🎉 for a win, ✅ for approval, 🤔 for “needs clarity”
- Assign a comment to a teammate with @name and a due date
Team benefits:
- Faster approvals for marketing copy or social captions
- Friendlier review cycles for student group work
- Clearer signals during product spec reviews
9. Manage sharing settings like a pro
That blue Share button does more than open a link. Use it with intent.
- Invite people by email, then pick a role: Viewer, Commenter, Editor
- Set link access for a wider audience when that makes sense
- Restrict download/print/copy for sensitive data
- Transfer ownership when handing off a project
- Add expiry on access for contractors
A pattern that works: editors inside the core team, commenters for stakeholders, viewers for leadership.
10. Roll back changes with Version History
Accidents happen during live edits. Version history is your safety net.
Open it:
File → Version history → See version history
You’ll see colour-coded edits by person and timestamp. Jump back to earlier drafts, copy text from a past version, or restore a full state.
Example: after a messy team edit, roll back to the previous morning, copy the intact section, return to the current draft, and paste it back in place.
Tip: name key milestones like “Client-approved draft” or “Published v1” so you can return instantly.
Organize and polish your documents
11. Build a clickable table of contents
Navigation matters once your doc passes a few screens.
Two options:
- Insert → Table of contents to add a ToC block
- View → Show outline for a left-side navigation panel
Docs pulls from headings (H1/H2/H3), so format those properly.
Great for:
- Academic papers and dissertations
- Long reports, strategy docs, handbooks
- Ebooks and course material
Tip: keep section names short and scannable to make the outline useful.
12. Generate quick summaries with @Summary
Busy readers skim first. Help them with a short, editable TL;DR.
Insert one: type @Summary at the top of the doc.
This block gives collaborators instant context. Edit the text to match your tone or add a mini agenda for meetings.
Where it shines: recaps, briefs, project updates, onboarding docs.
3 bonus Google Docs productivity tricks
13. Remove the text formatting when copy-pasting
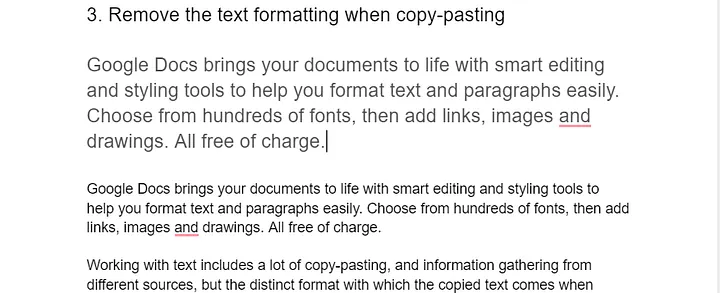
Working with text includes a lot of copy-pasting and information gathering, but the distinct format with which the copied text comes when pasted into Google Docs is annoying and ruins the document’s format.
Usually, the long way of cleaning this formatting is by pasting the text into an editor like Notepad and then copying and pasting it into the file.
Simple keyboard shortcuts can save your precious time when working with text. To strip the text’s old formatting, hit Command+Shift+V (for Mac) and Ctrl+Shift+V (in Windows) to paste clean plain text into the Docs file.
You can also right-click with your mouse and Paste without formatting.
14. Use ready-made templates to finish projects faster
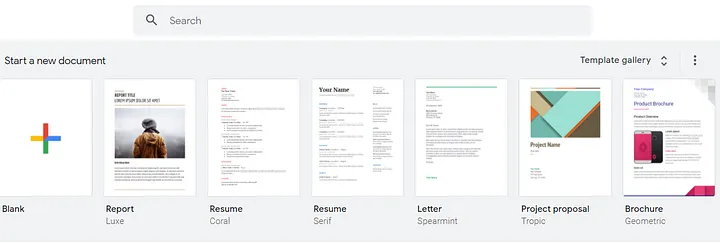
Have you tried creating a resume, CV, business proposal, or newsletter from scratch? That must’ve been exhausting and nerve-wracking. But with the use of Google Docs ready-made templates, you simply fill out the structure and get those documents done faster.
To access these templates, go to Google Docs white house (docs.google.com). There, you’ll see a few of the most used templates showing up, and then if these templates aren’t enough, you can click on Template Gallery for a more complete list of templates for different projects.
15. Replace content inside your document
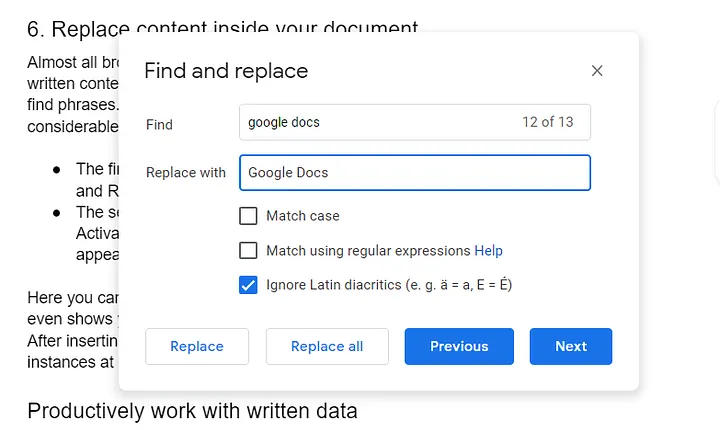
Almost all browsers have the option of searching words on the page, but when working on documents, you’ll also need to make edits. You might have to replace characters, words, or phrases of a considerable volume. In Google Docs, you can replace all searchable words at once.
- The first method is by selecting Edit from the menu and selecting the last option, Find and Replace from the dropdown menu.
- Similarly, you can use this function by pressing Ctrl/Command + F and then clicking the three dots (⋮) appearing at the right of the search bar.
Here you can put the phrases you want to search for and replace in the document. It even shows you the number of results and the option to correct them all at once or individually. After inserting the substitute, select Replace all and replace all instances at once.
Productively work with written data
Google Docs is pretty practical to use on the go, and it even allows you to send emails without having to exit the document you’re working on, as we saw.
These Google Docs tips help you complete projects faster, multitask, make edits at scale, and write or edit documents in more languages than you thought were available due to accent marks.
Let’s not forget the option to transcribe live spoken words to keep notes faster yourself, or transcribe what others say without typing a word.
You can also download it for mobile use for free here: Android | iPhone | iPad
Try these Google Docs tips today
Pick one feature and test it in your next doc:
- Turn on Pageless for long drafts
- Add a dropdown to track section status
- Insert an @email draft for your next client update
- Use Voice typing to speed up a messy first draft
- Add a ToC and an @Summary for easier navigation and context
If this helped, connect with me on LinkedIn. I work with tools like Google Docs on a daily basis, and I plan on sharing everything I’ve learned through simple guides like this.
